6 Steps to the Golf Swing
- The Pre Shot Planning
- The Setup
- The Takeaway
- The Downswing
- Impact
- The Finish
Golf can be a complicated game!
I am sure you have felt overwhelmed at times and are maybe seeking a way to keep it simple!
Overall, there are many different methods and approaches to swinging the golf golf. After years of studying the golf swing and studying the different instructors, I believe the approach below is one of the most simple approaches and provides a step by step guide on the golf swing.
The great thing about the golf world today is access to information on the golf swing. This can also make it overwhelming as there is a wealth of information at our fingertips.
I would highly recommend following an instructor and buying into that system.
I have reviewed many of the most popular golf instructors (see links at the bottom of this post). While they all somewhat vary from instructor to instructor the key is to find the one you can buy into. All of the systems have a chance of helping you improve, but it will take a commitment.
In the steps by step guide below, I will provide a description of that step and then provide a video.
I have selected the Shawn Clement approach to help with this step by step because many golfers are seeking a simple approach. One that makes sense and doesn’t take a phd to understand. Shawn Clement’s approach is brilliant and can help you improve, as early as your next round!
After taking you through the step by step of the golf I swing, I leave you with my top three drills that I believe lead to a reliable and consistent swing that provides you will training to head to the course with confidence and get rid of the feeling of uncertainty or fear of what your ball striking might be that day!
Ready! Let’s get going!
Update: I would highly recommend building skill in each of these areas by working on these 4 reliable drills found in the post linked here. The best golfers have certain skills such as low point control, curve control and total swing speed. Start your journey with these 4 drills!

The Golf Swing Step by Step (6 Key Steps)
Golf Swing Step by Step: The Pre Shot Planning (1)
Most quality shots in golf and the best golfers start with a plan where the process starts when arriving at the shot. The golfers will consider the lie of the shot, the yardage, the wind direction, the outcome desired and what ball flight is optimum to produce the outcome.
This will help with club selection and give the golfer clarity on what shot is best for their game. From there the golfer will need to select the target, an intermediate target and get into the setup. The key here is to stay within your game, don’t try to hit the hero shot and commit!
Those that fail to commit will often hit poor shots. Also, manipulating the swing due to a lack of commitment often happens and leads to disaster. When a golfer is in the zone, they are often focused on the target and have a clear task over the ball. Whether you shoot par or struggle to break 100, the goal should be to get to this point.
In this step, it is essential to have clarity, so that you can begin the process of hitting a quality shot!
Here is Shawn Clement on Pre Shot Planning:
Golf Swing Step by Step: The Setup (2)
We ready to step up and hit the shot. Now that we have the pre shot planning in play and we have clarity, it is time to make a quality motion. Keeping our task in mind, it is time to setup.
Keep in mind that we want a target off in the distance and an intermediate target about 1-2 feet in front of the ball.
If you follow the Shawn Clement approach, he will advise the golfer to set up to create the ball flight that is desired. The setup will be relaxed with some bend in the knees. Try to resist the stiffness that often occurs by trying to get into a perfect posture.
Get rid of that and instead feel comfortable over the ball. Check out Shawn Clement’s setup, it is relaxed with slight flex in the knees to be able to make a fluid, tension free swing.
Many golf instructors will spend hours at a lesson trying to get a person in the perfect posture, grip, alignment, etc. While I do believe the setup is important, there are some key elements such as being relaxed, not getting too straight of a back or being too rigid.
Golf is an athletic game and it starts with being in an athletic position when setting up
I would recommend a stronger grip, which for the right handed golfer it means the hands are rotated more towards the right or away from the target.
The most significant part of the setup is keeping your flight plan in mind. If you want to hit a draw. You want your club to be aimed slight right of the target with your feet and shoulder line slightly closed or aimed even more to the right. This will help create a ball flight that starts to the right and curves back towards the target.
As you set up over the ball, you want to feel that you are going to take the club back and throw it out towards the target and down the line of direction either right of the target line (for a draw) or left of the target line (for a fade). The hardest shot to hit in golf is the straight shot.
Check out Shawn Clement as he explains the importance of setup for a draw or fade:
Golf Swing Step by Step: The Takeaway (3)
Now that we have the ball flight plan and are set up to produce that ball flight it is time to start the swing. The key here is to give yourself a task of “cutting the dandelion” or “throwing the club down the fairway.”
Many golf instructors will start talking about getting into this position or this position. They spend hours ensuring the club is perfect about 3 feet away. When the reality is if you study many of the great swings you will see different backswings. The one main key is to make a complete turn.
You have to turn and rotate to help create a strong, fluid backswing that allows you to throw the club down the fairway and send the ball flying towards the target.
For years, especially in the 90s and early 2000s the takeaway was taught as a movement where you restrict the hips, and load your back leg. Don’t do that! Instead, straighten that right leg, turn those shoulders and hips and make a complete turn. Keep is simple!
This fluid like takeaway is getting you ready for a downswing that is powerful, sends the ball down the right start line and allows you to play the game with some enjoyment! My two favorite instructors for the takeaway are Shawn Clement and George Gankas.
I love how the instruction has evolved in recent years and there are more and more instructors promoting a full turn on the backswing and setting yourself up to use the ground and turn out of the way.
One of my favorite sayings that Shawn Clement is always saying is “out of the way, out of the way.” What he is promoting is out of the way on the backswing and out of the way on the downswing.
Here is Shawn working with his daughter on the takeaway:
Golf Swing Step by Step: The Downswing (4)
Now that we have kept it simple on the first three steps, let’s dive into the downswing. This is where the moment of truth gets closer and closer (impact).
Many golfers will try to start manipulate the downswing at this point. They are trying to pull their arms or keep their back to the target. They may be trying to get their left shoulder to a certain point. If you fall into one of these categories, stop the nonsense. Give yourself a task and let your body and mind takeover!
The video linked below talks about the natural motion in the downswing. The “out of the way, out of the way” and “throw the club in the direction you want the ball to start” are great swing thoughts and allow you to swing tension free. We are terrible at trying to hit certain positions, but a lot better at following a task.
Think of when we throw a baseball or shoot a basketball. We aren’t worried about all of these positions. Instead, we pick out the target and make the motion to get the ball going in that direction.
The great thing about golf is that we can control our setup and get ready for the shot. For some, this may be the worse part as well because it provides too much time to try to hit all 9 positions in the golf swing.
My biggest fault in the downswing is starting to stall with my body and over relying on my hands to make it work. On some days, I can be spot on with the timing of my hands.
However, once I learned to make a complete swing back and then get out of the way on the downswing, the clubhead became more stable and I can swing freely without trying to manipulate every shot with the timing of my hands!
The Shawn Clement and George Gankas approach of full turns on the way back and then the way through have helped revolutionize the consistency of my swing and I can now play better more frequently!
Wonderful video by Shawn Clement (pure gold at around 11:00)
Golf Swing Step by Step: Impact (5)
Maybe the least talked about part of the golf swing, but maybe the most important. I am afraid that many golfers, if asked to get into quality impact position would fail miserably to produce what is a quality impact position. In fact, many might think they just need to get back to their setup position. This is completely wrong.
The body is actually turned pretty far left or open for the right handed golfer at impact. The hands are ahead of the ball and lag tension has been generated, not from trying to create lag, but from making the right motion in the golf swing and getting “out of the way” on the downswing!
Shawn talks about “squeezing the ball through the door frame.” This is a task that helps the golfer start to compress the ball while “getting out of the way.”
Here is Shawn Clement “squeezing the ball through the door frame” If you struggle with ball contact this is a great visual:
Golf Swing Step by Step: The Finish (6)
The key here is to have a balanced finish where you swing through the shot and up to your finish. Too often, we can get stuck focusing on the ball and instead should focusing on keeping the club moving towards the target to quality finish.
When your focus is out on the target, you will more naturally have a quality, free flowing finish that helps you stay balanced, finish strong and then see your ball flying in the direction that you intended!
Here is Shawn Clement working on the finish:
Four Quality Drills
Drill #1: Low Point Control Drill
- Take some yard paint and paint a 1-2 yard long line.
- Setup with 55% of your weight on your front side.
- Try to hit the target side of the line and see how many times out of 10 you can do this successfully!
- Repeat this drill every day for a month, tracking your progress and your ability to to this successfully in trials of ten.
- You may need to start with half swing and progress to full swings.
Drill #2: Develop A Stock Shot
- At the driving range, set up an alignment stick about 6-8 yards in front of you, straight down your target line.
- If you have a second alignment stick, set the stick 3-4 yards right of the first stick (for a draw) or left of the first stick (for a fade).
- Complete your initial assessment and see how many times out of 10 you can start the ball to the right or left of your target. Pick one side and measure your game at this point.
- The goal is to eventually get 7 out of 10 shots to start to the correct side and draw back towards the target.
Drill #3: Train for Speed
For years people would often say, “drive for show, putt for dough” when the reality is that distance is important not only to overall scoring, but to consistency in the scoring. Those that have the greater distance have shorter shots into greens. This means hitting it closer on average, which results in more putts made.
There is a big difference between someone that can swing a driver 85 miles per hour vs someone swinging at 105 miles per hour. Even an increase in 5-8 miles per hour can mean 30 yards of extra distance. The really neat part is that recently there have been research studies on the best way to increase swing speed.
What we have learned is that overspeed training with lighter clubs can help train the mind and body to be able to swing faster. My example is that I used to swing between 98-101 miles per hour.
After training with the SuperSpeed program I am now between 105 and 108 miles per hour. In order to swing faster, you have to train by swing faster. With the lightest club in the protocol by SuperSpeed, I am swinging between 122 and 129 miles per hour. This than coverts to between 105-108 miles per hour with my actual driver when playing golfer.
The difference of 20-30 yards is important and one of the fastest ways to get better at golf. Would you rather be hitting a 7 iron from 155 or a PW from 125 after your drive? If you give yourself the shorter shot over the course of 18 holes, you are going to hit more greens in regulation, hit the ball closer to the hole, which then gives you a better chance of making the putt.
The formula is simple. The important part is to start training for speed using SuperSpeed Golf and improve your speed and gain 20-40 yards. It will make a massive difference!
Check current price on SuperSpeed Golf site.
Here is the training drill at the first protocol level:
Drill #4: Target Focused Drill
- Pick your target out on the range (A flagstick, tree, yardage marker, etc.)
- Pick a target even well beyond that target like a tree or some marker out in the distance.
- Draw a line in your mind back to where you can pick an intermediate target about 1-2 feet in front of the ball.
- Determine your “fight plan” (Draw, Fade or Straight Shot).
- Go ahead and set up over the ball.
- Focus on what shot you want to hit and where your target is.
- Keep the target in mind and get the ball started in the direction of the target.
- Picking a “flight plan” ahead of time will give your mind clarity in combination with the target.
- Hit the shot and measure how many times out of 20 you are within an acceptable range of your main target.
Take Your Game To The Next Level: Get Instant Feedback Through A Launch Monitor
Now that you have the step by step guide to the golf swing and 4 drills to get you headed in the right direction, it is time to consider adding a valuable device to give you instant feedback and the ability to practice at home with a net and your launch monitor. Start working 12 months a year on your game and you will see quick improvement.
If you visit any PGA Tour stop you will see the majority of professionals use a launch monitor at some point throughout the week . Many are monitoring their clubface, swing path relationship as well as swing speed. These are important numbers to monitor to make sure you are keeping your swing within a certain range.
Some of the key information that you will be able to received immediately after every swing includes:
- Ball Speed
- Club Speed
- Launch Angle
- Spin Rate
- Spin Axis
While many won’t have $16,000 to spend on a Trackman, there are some great affordable options that can be used at your local driving range, on the golf course or in your garage or house as part of a practice area of golf simulator setup.
Here are my top 3 recommend affordable golf launch monitors:
Over time, knowing where your numbers are when you are making quality swings will help you groove a swing and become more consistent. When you are struggling, you can use your launch monitor to see where your numbers are at. Is it a clubface or swing path issue?
When your spin axis number is really high either way, you know there is a major gap between the two. In the ideal world, you have a 1-3 degree difference between clubface and swing path, unless you are trying to hit a hook or slice intentionally then a bigger gap is desired.
Take Action – What You Can Do Today to Get Better
What does this mean for you? I believe in the following recipe to get better:
1 – Improve your motion in the golf swing by identifying a golf instructor. Here are some options:
Here is a list of golf instructors that we have reviewed:
2 – Train to swing faster and improve your swing speed. Here are some options:
Looking to gain more Speed and Distance in your swing. Two Options:
3 – Understand course strategy and work to break through your next barrier. Here is a series on breaking through:
We have provided guides on how to break 100, 90, 80 and 70. Check out more below, if interested.
4 – Practice Frequently
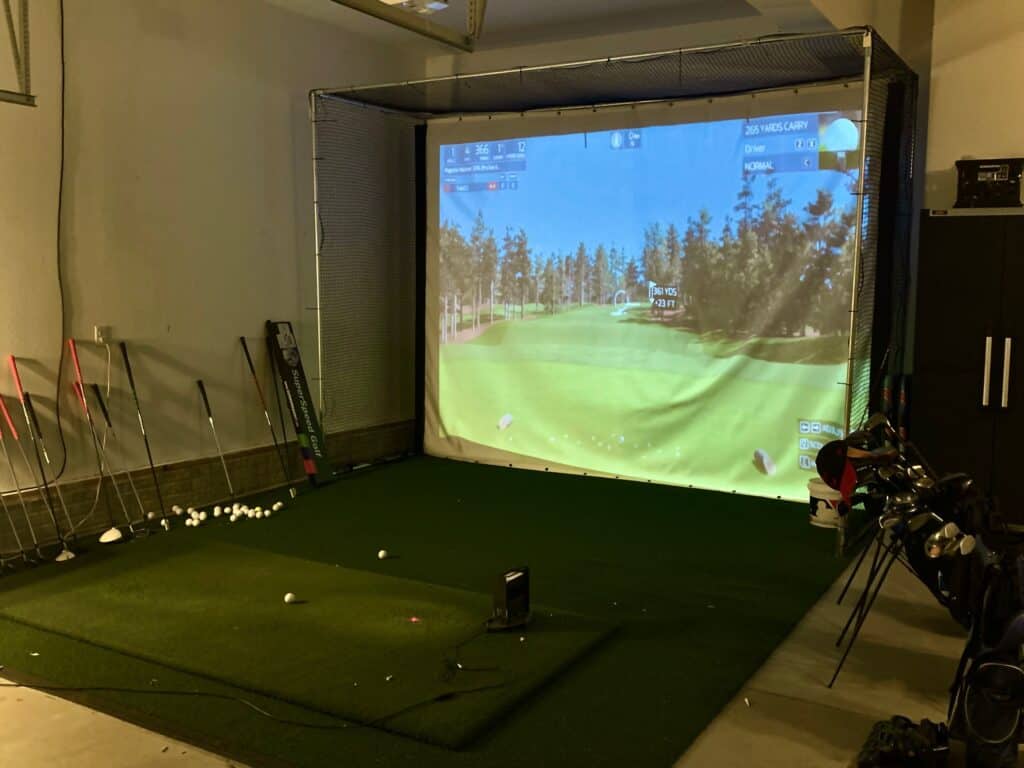
Did you know that I build a golf simulator in my garage and have played over 500 rounds of golf on my SkyTrak system? It has been a game changer and one worth checking out. Here are some of my other posts on golf simulators frequently asked questions:
- Is a Golf Simulator Worth It?
- How to Build a Golf Simulator?
- What is the Best Golf Simulator?
- Golf Simulator Accessories?
- How to Build a Golf Simulator for under $7000
- Top 11 Reasons to Buy a SkyTrak
- How to Build a Golf Simulator for Under $1000
- Why Build A Golf Simulator?
- What Space is Needed?
- Can A Golf Simulator Improve My Game?
- How Much Does A Golf Simulator Cost?
- Don’t Forget to Check out our 15 best golf swings of all time.

I am an amateur golfer on a journey to get better, enjoy the game as often as possible and share my passion and knowledge with others. I have coached high school golfers at a high level and have a great passion for the game and want to give back. I enjoy learning about the golf swing and am currently studying to be a certified professional golf instructor. Join me in our journey to get better everyday. Thank you for reading!